-

- Students explore Depth of Field, ISO: 800, F/5.6, 1/50 using Aperture Priority.
-

- Students explore Depth of Field, ISO: 800, F/5.6, 1/60 using Aperture Priority.
-

- Students explore Depth of Field, ISO: 800, F/5.6, 1/50 using Aperture Priority.
Depth of Field is the distance between the nearest object that appears in sharp focus and the most distant sharply focused object. The lens aperture, focal length, and the distance between the camera and the subject combine to determine the depth of field. The larger the aperture, the more shallow the depth of field. A shorter focal length, such as a wide angle, (above gallery images were photographed using a 55mm lens), will give more depth of field than a longer lens.
The typical way to change your depth of field is to set your aperture to a smaller width, like f/11, f/16, or f/22, to increase the depth of field, likewise to decrease the depth of field you would set your aperture to a larger width, like f/2.8, f/4, f/5.6. Another method of changing your depth of field is to change lenses or focal length. A shorter focal length, like a 28mm, increases your depth of field, while a lens with a longer focal length, like a 300mm, decreases your depth of field. You can also use your feet to change the distance from you to the subject. Increasing your distance from the subject will increase your depth of field while decreasing your distance will decrease the depth of field. You can use each of these methods by themselves or you can use a combination to create various results.
If you remember earlier in the year I made the recommendation to change your perspective by moving your feet. Good photographers always explore the angles and know why they change perspective to create well-composed images. This is also true for creating images that use depth of field to help tell the story through your images. Remember, as a photographer you are a storyteller and thinking before you click is important.
Please read “How to use Depth of Field to Take Better Pictures,” by Ben Long to get a better understanding of Depth of Field. He provides a great overview and many examples of how to create images using depth of field. You can use these tips using a DSLR or your smartphone if you have the right app.
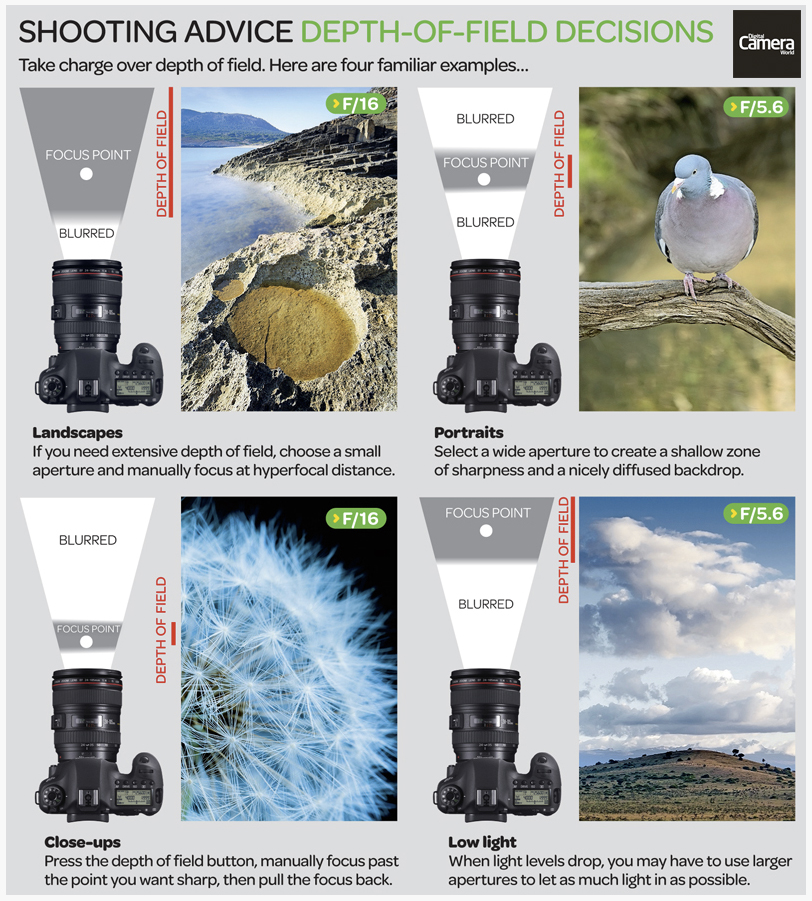
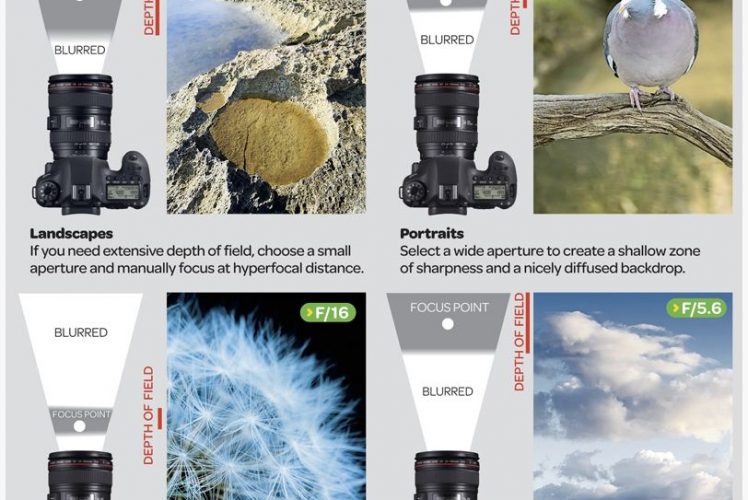
Shooting Advice Depth of Field Decisions.
You should also read “Cheat Sheet: Depth-of-Field Decisions,” by Matt Golowczynski. It visually helps you understand what depth of field is all about and how to make a decision when your taking pictures.
Today’s assignment is to help you better understand depth of field in a practical sense. Plus, you are going to improve your focusing techniques, exposure management, Lightroom image processing procedures, Photoshop skills, and Blog post creation. This assignment is about speed, using the right procedures, and creating a quality final product. You are working in teams of four so each person has responsibility.
There are three shooting lanes in the classroom. Each is marked with Picture, 5 Feet, 15 Feet, and 20 Feet. Each person is assigned an F-stop and will take three pictures.
- Break into a team of four.
- Assign each person an F-stop (F/5.6, F/8, F/11, and F/22).
- Format your camera SD card.
- Set your camera to Aperture Priority, ISO 1600, 55mm and your focus switch to manual. These images should be horizontal, not vertical. DON’T use Autofocus for this assignment!
- The first person will set their aperture to f/5.6 then manually focus on the person standing at 5 feet, refocus to the person standing at 15 feet and finally refocus on the person at 20 feet.
- Switch people so the person shooting at F/8, F/11, and F/22 can photograph the same distances.
- Once everyone in the group is finished return to your computers to ingest your images into Lightroom.
- Create a new catalog: FILE PATH – /Pictures/Assignment/DepthofField – FILE NAME: – Depth of Field
- Ingest just your images.
- Color correct, using the correct procedure then crop your image to 8×10.
- Sync your images so they look exactly the same.
- Right-click each image and EDIT IN – Photoshop.
- Create a new layer
- Use your Marque tool to create a rectangle and color fill to create a black or #000000 box.
- Use the text tool, Georgia font, 14 pt, white or #ffffff to identify the ISO, Shutter speed, F-stop, and camera mode.
- Create a second Text – Georgia font, 18 pt, white or #ffffff to identify the distance of the focused person.
- After you complete each image you will simply save so the image returns to Lightroom
- Export your image to your Depth of Field folder you created, you want to make sure that image quality is 100, the resolution is 72 and rename the files to Depth of Field – Sequence.
- After you have exported the images open your Edublog and create a gallery of your three images. In the caption file please identify the ISO, shutter speed, F-stop, and camera mode.
- Write a paragraph explaining your understanding of Depth of Field
- Write a paragraph explaining your camera technique for this assignment.
- Write a paragraph explaining how you used Lightroom and Photoshop to create a final image.
- Once you have completed each step post your assignment for a grade.
Your blog post with images should look similar to each person in your group and the example images I have in the gallery above. You need to work as a team to identify areas that you need help and problem solve as you complete the assignment. Make sure that you share your work with your parents.
